
Turkey Stock - a beauty-enhancing, money-saving, gut-healing, flavor-exploding recipe!
- Center for Rural Culture
- Nov 24, 2019
- 9 min read

By Guest Blogger Sallie Godwin of Real Fat Life
Thank you to Sallie Godwin, Fall Line Farms & Local Roots customer and creator of Real Fat Life, for sharing this post with all the details on making turkey stock.

Thanksgiving is just around the corner, meaning that TURKEYS are in season! Yay! I love turkey stock. It is more robust in flavor than chicken stock, but not quite as intense as beef stock. It is perfect for drinking! Any time. Any meal. Any weather. :) This recipe can easily be adapted for any kind of poultry stock - chicken, duck, or turkey - or a combination. All of it would be delicious! You really can't go wrong.
So be sure to save your turkey carcass from your Thanksgiving meal! I may just have a panic attack if anyone puts their turkey carcass in the trash... ;)

Stock Saves Me Money?
Don't throw away those turkey bones or that turkey carcass after your Thanksgiving dinner! Or any dinner for that matter. Make stock. Making stock with all your leftovers - bones, pieces, skin, fat, joints, necks, backs, feet - is a great way to be frugal in the kitchen. The stock can then be used for all kinds of soups, stews, sauces, and recipes - stretching your food dollars AND multiplying your nutrition!
Stock for flavor?
Stock is the foundation and a staple of every healthy ancestral kitchen. It is a true superfood. Cooking with stock that has been made from scratch is the secret ingredient of every ancestral chef. The bones and meat are simmered for a long time to draw every bit of flavor from them, along with the collagen and nutrients. All the famous French culinary chefs carefully prepare their rich beef stock for the base of their world-renowned french onion soup. It is delicious and incredibly nutritious! Turkey stock offers another delectable option for soup-making.
Stock for Beauty?
It is SO RICH in collagen that it actually can reverse aging in your skin! Drinking stock is an important part of any serious beauty and anti-aging routine. It rebuilds your skin from the inside out. It also rebuilds your intestinal tract lining, repairs your joints, and provides abundant vitamins and minerals for strength and vitality.
Stock for healing?
Its healing properties are well-known in ancestral tradition and it has been scientifically proven to strengthen the immune system and restore health. It also rebuilds your mineral stores and helps increase digestive juices to aid digestion and increase nutrient-absorption. Everyone knows that we need "Mama's chicken soup" to get well!
For more info on the health benefits of drinking stock, check out this great post from Weston A. Price for some further reading:

Ingredients:
1 turkey carcass (4-5 lbs) or 2-3 chicken carcasses (backs and necks, 4-5lbs.)- I get mine from Mickey and Anne's Farmette from FLF&LR
2 lbs. chicken feet - I got mine from Peacemeal Farm from FLF&LR
3lbs. leftover beef bones, chuck roast bone, steak bones, empty marrow bones (optional)
2lbs. turkey/chicken necks (optional) - I got mine from Forrest Green Farm from FLF&LR
1 or 2 Onions
1 bulb crushed, fresh Garlic
Fresh or dried herbs - rosemary, thyme, sage, bay leaves
3 Tbs. celtic salt (or just add this at the end to taste)
1/4 - 1/3c. apple cider vinegar
2+ gallons filtered water (I use a Berkey to filter all my water)
2 carrots and 2 celery stalks - (optional) - only add these for the last 12 hours of cooking
bunch of fresh parsley (optional)- add this for the last 15 min
You will need a large stock pot for this -- I have a 15.5qt one and I LOVE it! I really like the "graniteware" stock pots because they are super safe and non-reactive - while also not breaking the bank! If you want to make a smaller batch, a cute little 8-quart stock pot would be perfect.
(Please do not use any kind of non-stick or aluminum or copper stock pots - they are very toxic and the metals and chemicals will leach out into your stock during the long cook time. Cast iron, speckled enamelware, and "graniteware" are all safe options.)
I like to make REALLY big batches of stock at a time. ;) You can make as much or as little stock as you want - the more carcasses/feet/bones, the more water you use. The fewer turkey parts you have, the less water you use. The general rule of thumb is for every pound of parts you use, use 1 quart of water.
1 lb of parts: 1 quart of water

Do not be fooled by marketing terms that do NOT mean anything -- such as "vegetarian-fed" or "cage-free."
Where do I find the ingredients?
I highly recommend getting your turkey or chicken from a pastured source. For sourcing the best quality, your best bet is finding a local farm, like the ones featured on Fall Line Farms and Local Roots! If you are buying from the grocery store, look for labels like "local" and "pasture-raised."
Do not be fooled by marketing terms that do NOT mean anything -- such as "vegetarian-fed" or "cage-free." "Vegetarian-fed" actually means the birds were definitely in confinement; a bird's natural diet when roaming on pasture contains bugs and grubs - which are NOT vegetarian. To guarantee something is "vegetarian fed" means it was raised indoors and fed grain. A "vegetarian-fed" bird is not going to have been raised in the outdoors or on pasture. "Cage-free" likewise just indicates they were raised in a warehouse - technically not in "cages" but in one giant cage- not in the outdoors and definitely not on pasture.
I highly recommend you find a good local farm. My favorite way to buy my ingredients for stock here in RVA is through Fall Line Farms and Local Roots - a local farm co-op! Fall Line Farms is a network of over 40 local farms and I can place ONE order and get everything I need!
For sourcing the best quality, your best bet is finding a local farm!
10 steps for awesome turkey stock:
Step 1: Get a carcass!
Put the turkey or chicken carcasses, the chicken feet, the turkey/chicken necks, and the optional beef bones** in the stock pot. It is totally fine if they are still totally frozen solid - I do that all the time!!
(**I also save any beef bones from our meals such as the bone from chuck roasts, steak bones, or empty marrow bones. I collect them in a bag in the freezer and then I like to throw these in with my poultry stock because it adds extra minerals and calcium from the bones, but they don't have a strong "beef" flavor since they have already been cooked once!)

Step 2: Let it soak.
Cover it all with filtered water and fill the stock pot. Add about 1/4-1/3 cup apple cider vinegar (this helps pull the nutrients out into the broth). Let it all soak for an hour or so until the turkey and chicken parts are thawed. (Sometimes I accidentally leave it longer, especially if it is frozen solid!)

Step 3: Bring it to a boil.
Put the stock pot on your stove and bring to a boil slowly over medium-high heat.
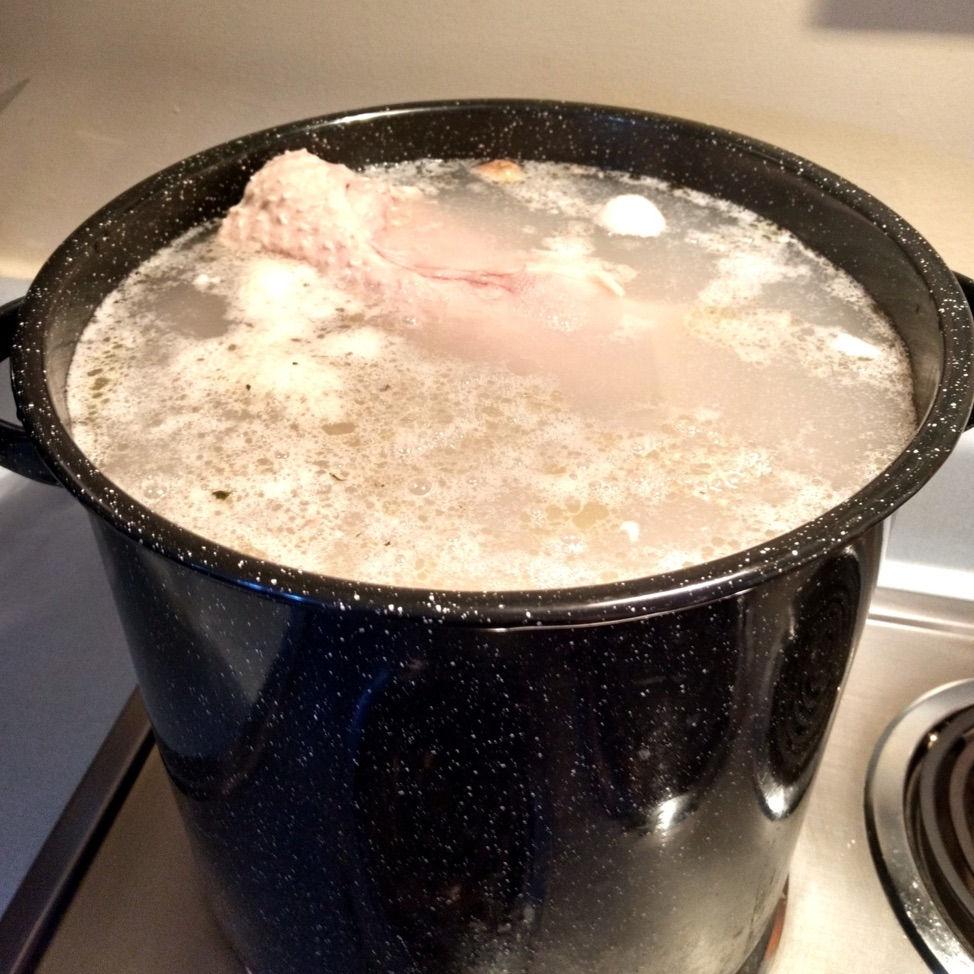
Step 4: Skim the foam.
When it begins to boil, the first thing to be released from the chicken are trace impurities which rise to the top and turn into a layer of weird-looking foam. This foam doesn't add any nutritional value and if left in the broth can add an off-flavor. You'll want to use a spoon or a small fine-mesh metal strainer to skim it off. I like to use a little one for skimming the foam off and a larger one for straining the stock when it is finished!

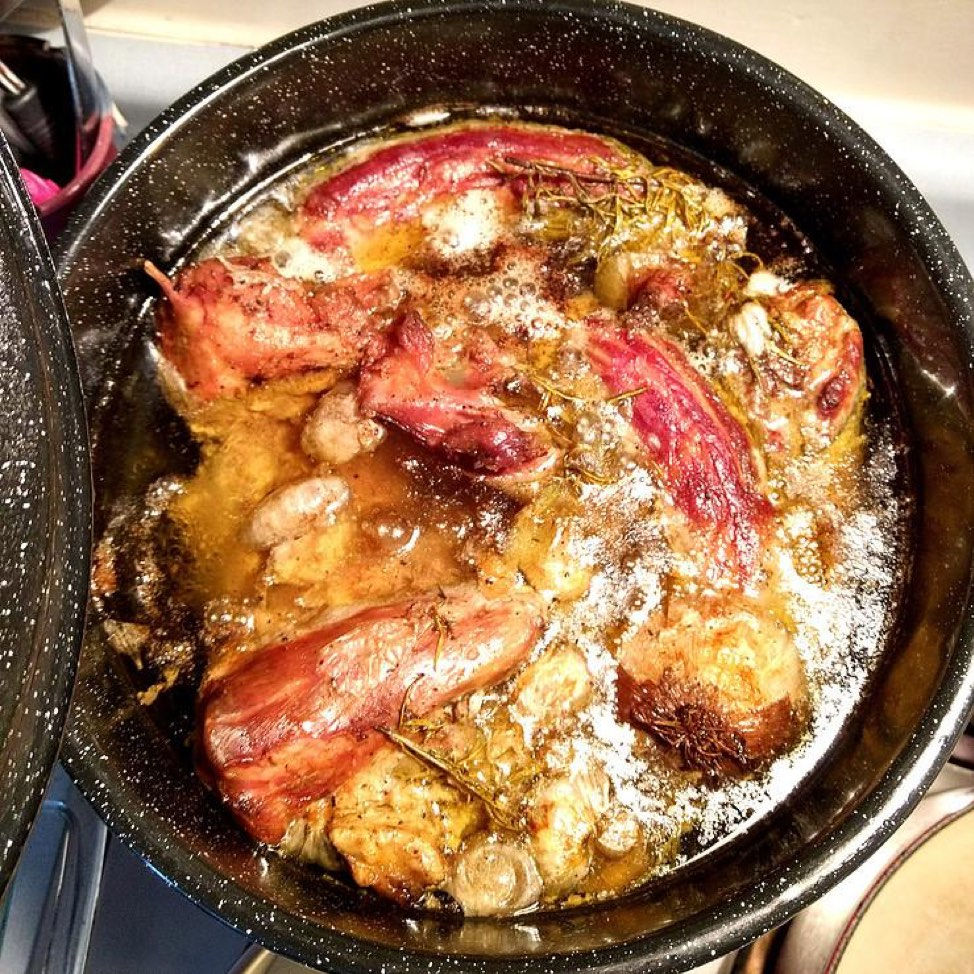
Step 5: Add the veggies and herbs.
Add some onions, garlic, peppercorns, herbs of choice, and Celtic sea salt (or you can add this to taste at the end as well). You can also add some carrots and celery, but don't add these till the last 6-12 hours of cooking or they will get a funny taste. If you want to add a big bunch of parsley for the last 15 min of cooking, that adds a really nice touch too! These days I just like to keep it simple: a bulb of crushed garlic, some big sprigs of fresh rosemary and thyme, and some Celtic salt is a beautiful combination! Don't worry about chopping things too precisely - you can just chop the onion into quarters and the garlic bulb in half - leaving the skins on and all. The carrots and celery can just be broken in half, and the sprigs of rosemary and thyme can all be thrown into the pot with no chopping at all!

Step 6: Turn it down!!
Once you have skimmed the foam and added herbs, cover and reduce to just *below* a simmer. You do not want it too hot. If it is too hot it will get a burned taste and the collagen will breakdown and not be as potent. Low and slow is the goal! Cover and let it cook for at least 24 hours. You can stir it every so often to help break up the carcass and help all the good stuff come out! Also, check on it every now and then to make sure it is NOT boiling.You want it barely at a simmer.
Step 7: Time to strain!
After a total of 24-36 hours, the stock is ready to be strained.All the turkey and chicken parts should be really broken down at this point, and the stock should be nice and dark and smell good! You will need a big metal strainer to strain into a saucepan or a quart-sized glass measuring cup. Here, I am using a middle-sized metal strainer along with a glass quart measuring cup.

Step 8: Seal It!
My favorite way to store the stock is in the refrigerator - "sealed" in Mason Jars. It's so much less hassle than freezing it and having to thaw it every time you need it. Pour the hot, strained stock into quart-sized wide-mouth mason jars.

Pro Tip: the trick is to pour the strained stock into the jars while it is still very warm (even hot-ish) and put the lids and bands on very tightly. I have found that this "seals" and preserves the stock in the refrigerator for up to a month!! If there is a delicious layer of fat on the top, it will even keep for longer!! If it was sealed correctly then the jar should "pop" when you open it. Just like when you open something that has been "canned."

Make sure you use real Ball Mason jars - which are made for canning and can withstand high temperatures. :) After you jar up the stock, let them sit on the counter a minute before you put them in the refrigerator. If they cool too fast they could break.
To freeze: Pour the stock into plastic quart-sized "ziplock" containers and put in the freezer. (Glass tends to break when you freeze it, so after a few mishaps and wasted stock, I just recommend using plastic now.)
Step 9: get the jiggle?!
When you open a jar of your refrigerated stock, it should be really gelatinous! If it is, that means you did it right! If it is still watery, that could mean either that it was cooked on too high of a temperature or that there was too much water and not enough turkey/chicken parts. Keep tweaking it until you get "the jiggle!"

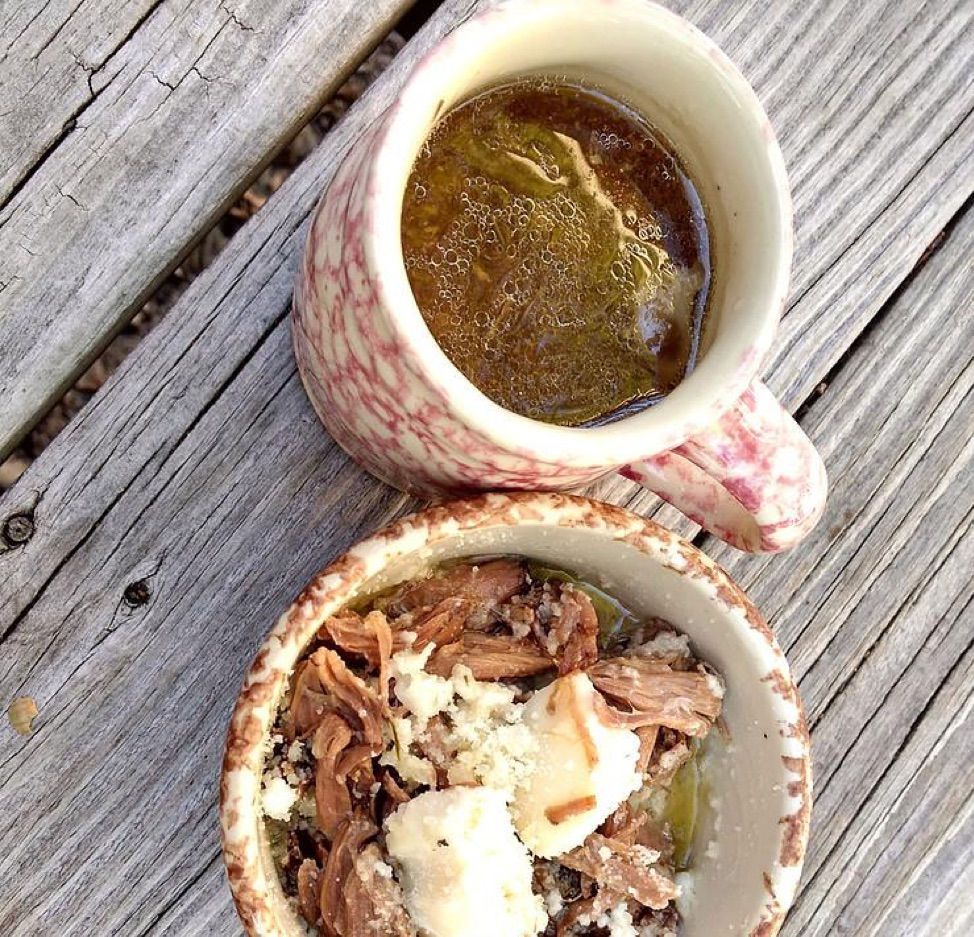
Step 10: Drink it daily!
I recommend drinking at least a mug a day. I sometimes drink a cup with each meal! Just re-heat the refrigerated stock in a small saucepan.

Feeding it to Kids
I drink stock daily with my dinner - probably around 2-3 cups of it. I feed it to my kids too - my 4-yr-old and 2-year-old both will drink it out of a sippy cup. sippy-cup And my 8-month-old old recently started drinking it out of a glass baby bottle. The older two also love to drink up the stock in their bowls using a kids’ medicine syringe. It’s kinda odd, but a genius way to get every last drop of stock in their bellies with no waste at all!

I like to top my stock with extra pink salt and eat it with a big spoonful of coconut cream concentrate. You could also top with some fresh parsley or cilantro and a squeeze of lemon or lime. Of course, you can use it in any recipes that call for chicken broth or stock. And you can create delicious soups and stews that will be sure to impress!
Let me know if you have any questions! I hope you enjoy! ~Sallie

About Sallie
I'm a lover of swimming, running, violin playing, and cooking! I am a classically trained violinist turned nutritionist. When I was studying music, I ran into a roadblock called "my-body-is-falling-apart-because-of industrial-crap-and-pharma.” I had to stop everything and give healing my body my full attention. I dropped out of music school for a semester to study nutrition. I soon discovered that ancestral cultures ate much differently than we do today. As I began incorporating some of the ways that they ate into my diet -- (things that our modern culture finds very "odd" such as lots of real animal fat and organ meat!) -- I began to heal my body and feel SO GOOD!!! I am passionate about sharing what I have found with anyone who is excited and open to learning.
I love all things local, sustainable, and pasture-raised. I'm a mom to three young kiddos and wife to Chance. You can usually find me running around in circles chasing my tail trying to keep up with my energetic kids, trying to write a blog post or do an Instagram story between diaper changes, or splattering grease all over my stove as I hurriedly cook all of our Real Food in REAL FAT!!
I am passionate about learning to live and eat like our great-great-great grandmas did. I am all about learning to live an "ancestral life in a modern world." Here at RealFat Life you can find tips and advice for healthy ancestral eating and how we at the Godwin house are on a journey -- learning to rock ancestral life in modern suburbia!


Comments